


Do you want to know how to automate Graylog server installation using Puppet in Debian? Then you’ve come to the right place.
You can use this particular tool to analyze the logs and generate alerts. We will start with a brief introduction to the Graylog server. Then, we will see how Puppet can help in installing the Graylog server on Debian.
What is a Graylog server?
Graylog is an open-source and free tool for managing and aggregating logs. Tracking and analyzing the logs can generate alerts through the Graylog server. A fantastic feature of this tool is that it can analyze structured and unstructured data. The following are the major components of the Graylog server:
- MongoDB: stores data and configurations.
- Graylog server: A web server that can visualize the logs through the browser.
- Elasticsearch: you can use it to analyze logs.
- Java/OpenJDK: The runtime environment for Elasticsearch.
The role of Puppet
Developed by Puppet Labs back in 2005, the Puppet tool helps in automating the installation of node components. It is also used to configure, manage and deploy the Graylog server.
Now we will go over the steps to install the Graylog server. And there are four steps to do so:
- Installation and configuration of the Puppet.
- Installation of required modules for the Puppet.
- Installation of Graylog server.
- Firewall settings and accessing the Graylog web interface.
How to Automate Graylog Server Installation using Puppet in Debian
Before we get to the core of this topic, we must first understand how to install and configure the Puppet tool.
Installation and configuration of Puppet
The first step of automate Graylog server installation using Puppet is to install Puppet. This will involve the installation of the Puppet server and the agent nodes attached to it. Note that in order for Graylog’s latest version server to work, you must install a version of Puppet that’s compatible with your system (i.e., Puppet >= 6.21.0 < 8.0.0).
Installation of Puppet
As this guide covers automate Graylog server installation using Puppet, we won’t provide the installation and configuration of Puppet due to space constraints. For CentOS 8, you can refer to the following, and similarly, for CentOS 7, see here.
Confirm the connectivity
Once you’re done configuring and installing the Puppet client, you may now confirm its connectivity with this command:
$sudo /opt/puppetlabs/bin/puppet agent –t
Installation of the required Puppet module
Now, we will install the module of the Puppet needed.
Install the Graylog Puppet module
You can install the Graylog module using the following command:
$ sudo /opt/puppetlabs/bin/puppet module install graylog/graylog
Furthermore, we need to install other modules as well. To install the Puppet APT module, input this command:
$sudo /opt/puppetlabs/bin/puppet module install puppetlabs-apt --version <version-number>
You can also install Puppet’s standard library module using this:
$sudo /opt/puppetlabs/bin/puppet module install puppetlabs-stdlib --version <version-number>
Installation of Puppet MongoDB module
You can install the MongoDB module using the following command:
$ sudo /opt/puppetlabs/bin/puppet module install puppet-mongodb
Installation of Java module
Finally, you will need to install the Java module using the following command:
$ sudo /opt/puppetlabs/bin/puppet module install puppetlabs-java
Installation of Elasticsearch module
Use the following command to install Elasticsearch:
$ sudo /opt/puppetlabs/bin/puppet module install puppet-elasticsearch
Verifying the list of installed modules
After installing the previous modules, you can now check the list of installed Puppet modules using this command:
$ sudo /opt/puppetlabs/bin/puppet module list --environment production
You should see the following output:

Installation of Graylog server module
After installing the modules, we will create a manifest file. With it, we will manage MongoDB, Elasticsearch, and Graylog server on a single node. Follow the steps below.
Create manifest file
Using your favorite editor, create a file as follows:
$sudo vim /etc/puppetlabs/code/environments/production/manifests/init.pp
In the file, replace the line password_secret with pwgen with this:
$ pwgen -N 1 -s 96
For the admin password, type the following command:
$ echo -n "Enter Password: " && head -1 </dev/stdin | tr -d '\n' | sha256sum | cut -d" " -f1
Adding the repository
While applying the manifest for MongoDB, you may get an error for Debian or Ubuntu users. To resolve this error, add the repository using the following command:
$wget -qO - https://www.mongodb.org/static/pgp/server-4.4.asc | sudo apt-key add -
$echo "deb http://repo.mongodb.org/apt/debian buster/mongodb-org/4.4 main"|sudo tee /etc/apt/sources.list.d/mongodb-org.list
$sudo apt update
Edit the manifest file
Now edit the manifest as follows:
class { 'mongodb::globals':
manage_package_repo => false,
manage_package      => true,
}->
class { 'mongodb::server':
bind_ip => ['127.0.0.1'],
ensure     => 'present',
restart    => true,
}->
class { 'mongodb::client':
}
....
Run the manifest on the agent
Finally, run the manifest on the agent using the following command:
$sudo /opt/puppetlabs/bin/puppet agent –t
Verifying that elastic search is running
Verify that Elasticsearch is running using the following command:
$ curl -X GET localhost:9200
Here, 9200 is the port where the elastic search is running.
Accessing the Graylog interface
We will now add the firewall rules and then access the Graylog from the browser.
Add firewall rules
You will need to allow port 9200 through the firewall. Run the following command on your Terminal for this purpose:
For Firewall:
$sudo firewall-cmd --add-port=9000/tcp --permanent
$sudo firewall-cmd --reload
For UFW:
$sudo ufw allow 9000/tcp
Access the Graylog web interface
Now, you can access the Graylog web interface by pointing your browser to the following URL:
http://ip_address:9000/
Provide the login credentials. And after once the installation is successful, you should see the following screen:
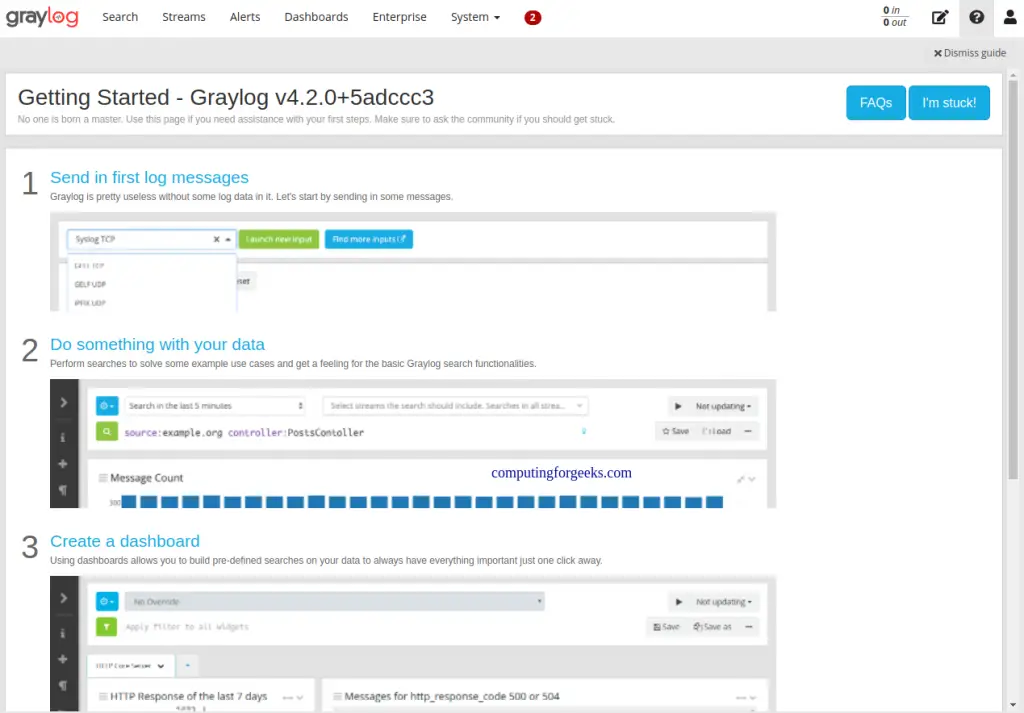
Now, you can create dashboards to visualize the logs on Graylog GUI.
In this article, we discussed how to automate Graylog server installation using Puppet on Debian. It is a free and open-source tool used to analyze logs and generate alerts. Lastly, we have discussed the four significant steps for the installation of this tool.
If this guide helped you, please share it.
