Odoo, formerly known as OpenERP, is an extensive open-source enterprise resource planning (ERP) software. It is an integrated suite of business apps and modules that helps enterprises run and manage their businesses.
These modules include e-commerce, customer relationship management (CRM), accounting, billing, financial management, project management, warehouse management, inventory management, manufacturing, and purchasing. The goal is to create seamless and efficient communication with each module to exchange information.
Since Odoo is open-source software, it is highly customizable. Developers and business owners alike can access the code and modify the modules according to their organization’s requirements. In addition, you can also integrate Odoo with other systems like eBay, Amazon, FedEx, UPS, and QuickBooks.
There are different ways to install Odoo 14 on Ubuntu. This includes using the official Odoo APT repository, installing in a virtual environment, and deploying as a Docker container.
The quickest and easiest installation option is through the APT repository. However, the remaining ways allow you to have more control and easier management over Odoo. In addition, you would also be able to execute several Odoo instances in one system. In the end, what option you choose would depend on your use case and available technologies.
This tutorial will discuss how to install and deploy Odoo 14 inside a Python virtual environment on Ubuntu 20.04. Moreover, we will download Odoo from its source, their official Git repository.
Prerequisites
Before we begin the installation process, your system should meet the following minimum requirements for proper installation.
- An Ubuntu 20.04 with at least 2 GB RAM
- PostgreSQL for database
- A non-root user with sudo privileges
How to Install Odoo 14 on Ubuntu 20.04
We will now begin the installation process. The steps are numbered for your convenience.
1. Install the Dependencies
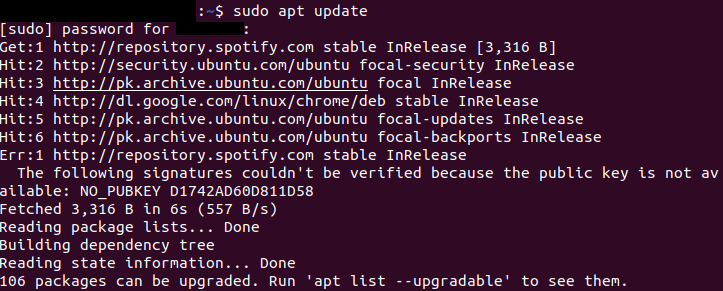
The first step is to update your system.
sudo apt update
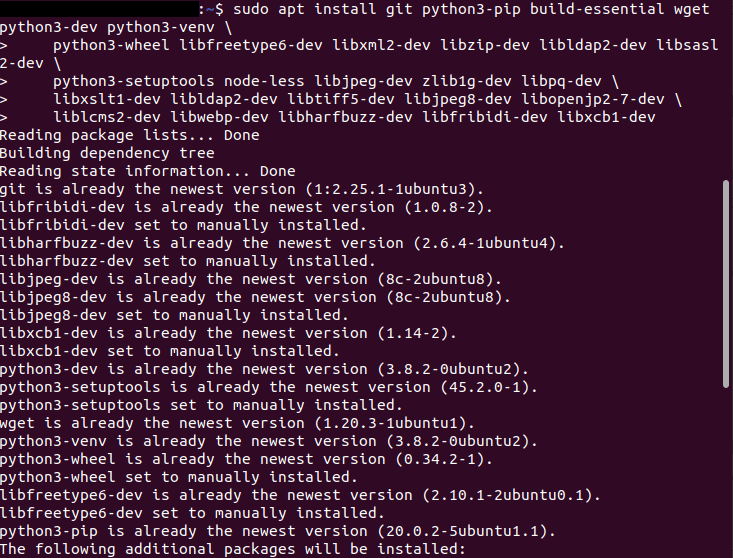
After that, input the commands below to install every Odoo dependencies, which includes Pip, Git, and Node.js.
sudo apt install git python3-pip build-essential wget python3-dev python3-venv \
python3-wheel libfreetype6-dev libxml2-dev libzip-dev libldap2-dev libsasl2-dev \
python3-setuptools node-less libjpeg-dev zlib1g-dev libpq-dev \
libxslt1-dev libldap2-dev libtiff5-dev libjpeg8-dev libopenjp2-7-dev \
liblcms2-dev libwebp-dev libharfbuzz-dev libfribidi-dev libxcb1-dev
2. Create a System User
It is not allowed to run Odoo using a root user since it can be a potential security risk. That is why you need to create a new system user and group with the home directory under the path /opt/odoo14. To do this, run the command below.
sudo useradd -m -d /opt/odoo14 -U -r -s /bin/bash odoo14

You can input any name for the user; in this scenario, it’s “odoo14″. However, you also have to label your PostgreSQL username in the same name.
3. Install and Configure PostgreSQL
Odoo is using PostgreSQL as their database. Moreover, PostgreSQL is already added in the usual Ubuntu repositories. Enter the command below to install it.
sudo apt install postgresql

After the PostgreSQL installation is complete, you need to make a PostgreSQL user. Remember that the PostgreSQL username should be the same as the system user you previously created. In our case, the name is “odoo14”.
sudo su - postgres -c "createuser -s odoo14"

4. Install wkhtmltopdf
wkhtmltopdf is an open-source command-line tool used to render HTML pages to PDFs and other image formats. Install the wkhtmltox package version 0.12.6 to print PDF reports in Odoo. This can be downloaded from GitHub using the wget command.
sudo wget sudo wget https://github.com/wkhtmltopdf/packaging/releases/download/0.12.6-1/wkhtmltox_0.12.6-1.bionic_amd64.deb

When the file is downloaded, install the package by entering the command below.
sudo apt install ./wkhtmltox_0.12.5-1.bionic_amd64.deb

5. Install and Configure Odoo 14
As previously mentioned in the beginning, we will discuss downloading Odoo from the Git repository and installing it through an isolated Python virtual environment.
The first step, change the user to the new system user you created. In this tutorial, it’s “odoo14”.
sudo su - odoo14

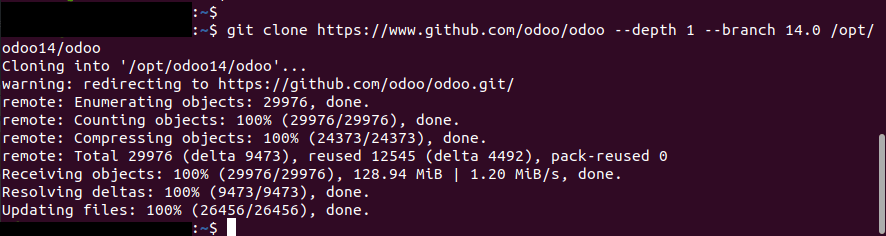
Since we are downloading Odoo 14 from the GitHub repository, ensure to clone the source code in your system. Furthermore, we are installing Odoo 14, so use 14.0 as your branch name.
git clone https://www.github.com/odoo/odoo --depth 1 --branch 14.0 /opt/odoo14/odoo
Next, change the directory into /opt/odoo14.
cd /opt/odoo14
Then, create a Python virtual environment for isolating applications, like Odoo.
python3 -m venv odoo-venv

Afterwards, activate the environment.
source odoo-venv/bin/activate

Once you see the system prompt as (venv) $, it means you successfully activated the virtual environment. Then, the next step is to install all the necessary Python modules for Odoo using pip3. Reminder, this can take some.
pip3 install wheel

pip3 install -r odoo/requirements.txt

Note: If you run into any compilation problem in this step, ensure that you installed all the required dependencies from Step 1. Installing Dependencies section.
When it is finished, deactivate the virtual environment.
deactivate

Now, set up a new directory in /opt/odoo14 path. This directory holds the third party add-ons that were going to be added in the configuration.
mkdir /opt/odoo14/odoo-custom-addons

After that, include the newly created directory to the addons_path parameter. Odoo uses this parameter to search for modules since it has a catalog of their directories.
Next, change back to your sudo user.
exit

Subsequently, set up a configuration file.
sudo nano /etc/odoo14.conf
Include the following contents into the configuration file.
[options]
; This is the password that allows database operations:
admin_passwd = my_admin_passwd
db_host = False
db_port = False
db_user = odoo14
db_password = False
addons_path = /opt/odoo14/odoo/addons,/opt/odoo14/odoo-custom-addons
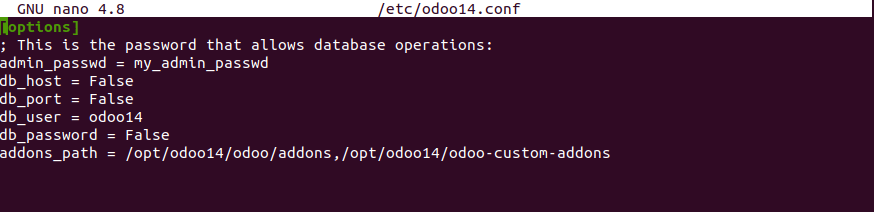
Note: Change the admin_password into a more secure one.
6. Create a Systemd Unit File
Go to your text editor and make a Systemd unit file named “odoo14.service” under the /etc/systemd/system/ directory. This file is for Odoo service management, where it can help you manage their service efficiently and allows you to start Odoo on system boot.
sudo nano /etc/systemd/system/odoo14.service
Then, add the following contents.
[Unit]

Description=Odoo14

Requires=postgresql.service
After=network.target postgresql.service

[Service]

Type=simple

SyslogIdentifier=odoo14
PermissionsStartOnly=true

User=odoo14

Group=odoo14
ExecStart=/opt/odoo14/odoo-venv/bin/python3 /opt/odoo14/odoo/odoo-bin -c /etc/odoo14.conf

StandardOutput=journal+console

[Install]

WantedBy=multi-user.target

Save and then close the file.
After that, notify the systemd that there’s a new unit file by reloading the systemd daemon.
sudo systemctl daemon-reload

Now, commence the Odoo service. Moreover, authorize it to auto-start on system boot.
sudo systemctl enable --now odoo.service

Verify the service status.
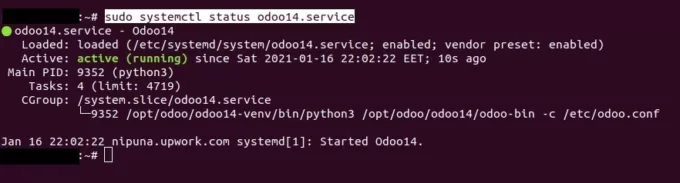
sudo systemctl status odoo.service
The output should show that Odoo service is active and running.
You can see the messages recorded by the Odoo service by entering this command.
sudo journalctl -u odoo14

7. Accessing the Odoo 14 Application
The default port of Odoo is 8069. Open the web browser in your system and then connect to the Odoo server on the 8069 port.
http://server-ip-host:8069
Assuming that the installation process is successful, you will find the Odoo web page on your screen.

Odoo is a comprehensive open-source ERP software that aims to help companies cut costs, streamline processes, and grow their business. They have over 30 main modules that are upgraded regularly. Moreover, they have more than 16,000 third-party apps/plug-ins that customers can avail themselves of in their app store.
There are two (2) available versions of Odoo: (1) the free version, Odoo Community, and (2) Odoo Enterprise. In addition, Android and iOS applications are available for the paid version.
If this guide helped you, please share it.